
After a very long break (over 10 years) I decided to start collecting and playing 40k again a couple of years ago. I'll cover my army(-ies) in future posts, these next few posts are about the scenery I've been making.
 |
| The second coming of my Dark Angels! |
I covered my simple table set up and simple roads on mywargame yonks ago, so there's the links.
The route I went down initially then was moulding my own pieces to construct various buildings. After some web surfing I found the really excellent Hirst Arts site. After reading up on the materials needed and techniques involved I thought 'I can do that' and then had to decide what mould(s) to buy. Realistically the moulds are quite expensive so I was going to have to either make a LOT of scenery to justify the cost or find one mould that would do a lot of work.
I decided that mould 300 - 'Station builder' would do a lot for me - the example structures alone would be a good start.
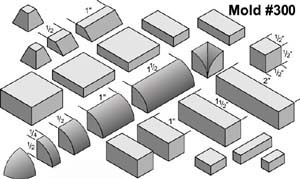 |
| Not the most exciting picture, sorry |
So I ordered my mould and then went about collecting the other materials I would need. Again the Hirst site has a lot of information about how best to set yourself up so I wont go into a lot of detail. Key thing I found that was apart from the plaster of paris, all of the tools I needed I managed to pick up from Poundland so it cost me very little. I've cast from the mould over 40 times (I didn't count, I can work it out from the Hirst instructions!) and all of my kit is still fine so no problem there.
One thing I did discover was that I tended to mix a bit too much plaster each time to ensure I had enough to fill the entire mould. My wife on an inspired shopping trip solved this issue -
 |
| Lakeland's finest |
Yes, brownie moulds. I simply pour the spare plaster into this mould and now have a collection of large blocks for use in future projects. They aren't quite the same dimensions as the Hirst blocks, but they are close and I have managed to find several uses for them.
So armed with a pile of blocks and instructions on how to use them I went ahead and built a bunch of things. I've been using PVA to glue it together (the Hirst site recommends all sorts of things, largely of an American flavour) and base coating the structures with Gesso Primer to both seal the surface and give it some 'tooth' so the subsequent paints don't come off so easily. I recommend basing the structures - I've been using mounting card (I have a large supply hanging around).
 |
| Bunker in progress, with a Dark Angel marine for scale |
 |
| Mostly finished bunker (base needs finishing) |
The bunker was my first building and I liked it so much I made two in the end. I've added the Imperial Aquila from the 40k basing kit to the front and a few spare bits to the base for flavour.
 |
| STATION |
 |
| Wot no caption? |
I've also made a few walls, making use of the 'brownie' blocks - with added battle damage. Very easy to do with plaster of paris - a knife, drill, scissors or even determined finger nail will add some effective looking battle damage to the material.
Well that's the end of part I - part II will cover the latest building I've built, this time of my own design and the scenario that inspired it.
No comments:
Post a Comment