I've been remiss in not posting on this blog a decision I made a couple of months ago.
I'm now posting on http://www.mywargame.com/ - you'll find there's a more frequent flow of articles on there from several authors on a wider range of topics. I hope you'll follow me there, but if not thanks for becoming a loyal follower here!
Recent posts I have done are:
My Everyblight forces for Warmachine/Hordes
A review of Reaper's Bones and Cthuhlu
A review of Ramshackle's Rhebok
Some steampunk minis I turned into Wedding cake toppers
The final Malifaux 1.5 event I ran

Saturday, 26 October 2013
Sunday, 4 August 2013
More Malifaux figures
Well this week I have mostly been painting my kitchen and looking at my much delayed but very exciting Kickstarter goodies - more on those in some future posts hopefully. A heads up that my genestealer giveaway ends tomorrow - I am finding I literally can't give them away currently.
Rather than let the weekend pass without a post, here's some Malifaux figures I've finished this year and not posted for one reason or another.
 First up is a warden I painted for Ian at my local gaming club. He was kind enough to let me have his Shang figure so I offered to fix the warden up and paint it (it was missing a claw). I've used my snow base technique here, without the snow that is.

 Next its a couple of Waldgeists. These beasties featured in my brawl blog the other week for the first time and I thought I'd show them in a bit more detail. I've used the Fenris games woodland bases here, extras from my gatorman squad. These are a very recent purchase - with the immenent release of Malifaux version 2.0 I discovered they are useful to a Zoraida crew in the new version and I like the current models. If the new plastic versions are good too, well they fit into at least 3 crews I have (Zoraida, Lillith and Marcus) so it wont hurt to have some variety!
This ugly critter is an Insidious Madness. Its usable by both my Zoraida and Kirai crew, but I haven't actually put it on the table yet. Clearly inspired by Lovecraftian themes, I added an interesting bit of freehand to the base :)

 These dapper looking ne'er-do-wells are my Wastrels from my long time in progress Lucas McCabe crew. Again using my snow basing technique (plus a few cacti), all of my Guild models will be based on slate (cork) to tie them together visually. These are the only other plastic Wyrd figures I have completed so far aside from Yin. I did manage to undercoat these without losing any detail but I have to say they are a challenge to paint with the sculpted details being so fine. I hope I get better at completing them, although I hear the later releases are improving in terms of both the detail and not using such tiny components separately (the bowler hat for example).

Rather than let the weekend pass without a post, here's some Malifaux figures I've finished this year and not posted for one reason or another.


This ugly critter is an Insidious Madness. Its usable by both my Zoraida and Kirai crew, but I haven't actually put it on the table yet. Clearly inspired by Lovecraftian themes, I added an interesting bit of freehand to the base :)


Thursday, 1 August 2013
Making snow bases for miniatures
A mid week post!
As a follow up to my Legion of Orangeblight post, I've put together a quick step by step tutorial of how I made the bases. I like to imagine someone asked me how I did it.
I also want to remind anyone out there who might be interested that I am giving away some painted Genestealers as a little compo on my previous blog post - not many people seem keen so a very good chance you'll get one if you follow the instructions.
So, snowy bases.

 Step 2: The left base is going to be a low base and I need to cover the slot as I will be using sand to texture the base. The right will be raised with stone, using cork, so I dont need to worry about the gap.
 Step 3: PVA. I water the glue down by varying amounts for different uses. At this point its 80% glue, a nice thick coating.

 Step 5: Dipping in sand. I have a tin with sand of all sorts of grades mixed in and some small bits of slate. Whenever I pop to a hobby store and they have some sand I haven't seen before I buy a small bag and add it to my tin. Make sure all the PVA is covered at this stage.
 Step 6: Sealing the sand. (Important!) Once the first coat is completely dry, using more PVA (50% mix this time) I completely coat all the sand with glue. I've found over the years the bottom coat alone will slowly shed sand over time, especially if you play with the figure or transport it a lot, This step helps prevent that somewhat.
 Step 7: While the top coat of PVA was drying I added some more cork to my stony base to raise the level and make it wider - the beastie I have is quite long for his base size. PVA used again (100%).
 Step 8: (Only once everything is dry) position the figures. I'd already put together the figures that these bases were destined for (yes filed, pinned and greenstuff'd like the OCD hobbist I am) and added pins to their feet. Using these as guides I was able to make small holes in the bases. Next I used a pin vice to drill deep holes into the bases so I knew where they would sit once painted - its easier to do this before you do a nice job and then mess it up with a drill!
 Step 9 : Undercoat - your usual choice of black spray


 Step 12 & 13: I missed a couple of photos here! First I base coated the stone in GW Fang and then drybrushed it with both Russ Grey and Fenris Grey. I should have tidied the black edges of the bases at this point - make sure you do.
 Step 14: Snow goo. So my recipe for cheap snow is baking soda and PVA. I mix by eye, till I get the consistency you see here. Just add more powder or glue as needed till you are happy.
 Step 15: Apply snow like paste. Plonk the snow down where you think looks best. I'm still figuring out how best to do this both practically (with a paint brush or modelling tool seems best so far) and aesthetically (it doesn't always look great). You can apply many layers of paste if you like (leave each to dry before adding the next) if you want really deep snow.
 Step 16: Make fluffy snow. Once everything was dry, using PVA (80%) I lightly coated the snow paste and then dusted the bases with baking soda. This will mean that powder will come off the bases for a while (even blowing really hard doesn't remove all the loose powder) but it looks much better than leaving at just the paste stage.
Step 17: Was tidy up the paint on the bases but I quickly found out that the baking soda sucks paint to it from some distance away so this is not the place to do this. Tidy the bases at step 13.
Well that's it, hope this is useful and don't forget, free Genestealers!
As a follow up to my Legion of Orangeblight post, I've put together a quick step by step tutorial of how I made the bases. I like to imagine someone asked me how I did it.
I also want to remind anyone out there who might be interested that I am giving away some painted Genestealers as a little compo on my previous blog post - not many people seem keen so a very good chance you'll get one if you follow the instructions.
So, snowy bases.

Step 1: Select your bases. These are 40mm round recessed bases for Hordes figures, but this works for most bases.


Step 4: Positioning some cork. This is a 2-3mm thick piece from a tile. Different thicknesses work, depending on the look you are after and what you can find (I'm struggling to find a supply). The cork will stick really firmly to the PVA.


Step 10: Sand base coat. I'm using GW mournfang brown here.

Step 11: Dry brush sand. Using a small dry brush I've coated this sand in GW Averland Sunset.


Step 17: Was tidy up the paint on the bases but I quickly found out that the baking soda sucks paint to it from some distance away so this is not the place to do this. Tidy the bases at step 13.
Well that's it, hope this is useful and don't forget, free Genestealers!
Saturday, 27 July 2013
Starting Legion of Everblight
Ok, this is a long one, but bear with it, there's a competition in here!
Last year I took the plunge into Privateer Press's Warmachine/ Hordes games by starting a Minions army. My gators have had a few posts of their own but although I like the models, I found their choices limited, their game play restrictive and a bit defensive in what is generally an extremely aggressive game.
I have been thinking for a while maybe I picked the wrong faction for my play style, certainly when just starting out with a game finding an army you enjoy is important. With the news that my local store 7th Heaven Games was going to run another Journeyman league I thought I'd approach the game with a fresh set of eyes and give it another go.
After a lot of pondering and reading of the excellent BattleCollege I decided that I rather liked the Legion of Everblight.
As well than my dragon fixation, I noticed the shredders reminded me a lot of the Cheat, so that more or less sealed the deal. Things got sweeter when I found someone (thanks Hobbydad) to share the 2 player starter box with - Legion are one of the two forces in the box and along with a mini rulebook, for the same price as a starter battlebox you get an entire unit of troops extra (big beefy infantry at that).
Having chosen my new army, I then had to decide how to paint it. I didn't want to use the standard colours if I could find another scheme that worked plus there's 3 other local players with Legion already so I wanted mine to be a bit different. For inspiration I looked on the official forums for ideas (link here).
I narrowed my inspirations down to 3:
Some amazing paintwork here and a really interesting idea. Click on the name to go to CloudFang direct on the forum and see more of his work.
A minor variation of the main scheme and some great paintwork once again. Click on PG_Col_Festus's name to see more. This made me think about how I could tweak the main colours and still have my own flavour.
The last option was a lot more unusual. CaptainSpud's scheme is, well, orange and you may have noticed on this blog I like orange, although I never paint a lot of it. This chap has featured in the pages of No Quarter magazine so clearly this is a top notch job as well.
Having chosen three templates, I needed to try them out. I like painting over a black undercoat and while I am happy to take my time, I don't want to go mad with very difficult colours or effects (hello and goodbye yellow). I had some GW Genestealers spare that share a lot of features with the Legion - chitin armour plates, tough skin areas, lots of arms and claws and teeth. Hopefully I would be able to make a decision based on how painting them went. For all the schemes I used GW's current paint range, generally their recommended colour progressions as well. My thinking was I needed to be able to get hold of the colours easily (in order to be able to add to the army for years to come) and if possible avoid mixing highlights to make everything as consistent as I could.


 ...and here's the Shredders. Notice how they aren't a million miles away from the Cheat? These little mouths on legs are a lot of fun to paint but there's not a lot of armour on them so I'd need to get to a bigger beastie to see how that looked.


 Here's the Ravagore version, a simple head and upper arm swap and I have a different beast to use in my games, this one is an acid spitting monster (I have a flame/acid spurt effect to add to the mouth once its complete).

 Finally there's the Scythean, a close combat specialist with huge shoulder spines for some reason.
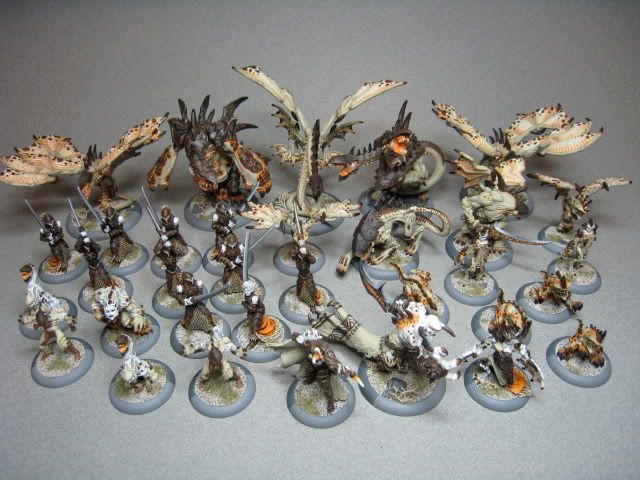
 Here's the battle box group shot, the basic starter force. Its 13 points which is a lot for a battlebox and very effective in the game (unless you are playing against Mark's Stearforge). I've played a lot of games at battlebox level, winning 4 out of 6. At 15 and 25 points I've played 2 games each and just (and I mean really close in some cases) managed to win all 4. I strongly suspect my luck is well overdue a bashing so I'm already at peace with an inevitable string of loses soon!
That more or less brings me up to date with my new Hordes army, the henceforth named Legion of Orangeblight. The league expands up to 35 points which means I have a lot more things to paint and I hope to show these in my blog over the coming weeks.
This just leaves the competition. Now I've chosen my colour scheme I've got 3 Genestealers floating around who are in need of a good home. Post a comment below as a registered member of my blog (sorry you can't enter anonymously) if you'd like one - you can state a colour preference if you like and if there's more than 3 people interested, I'll pull names out of a hat. Obviously you'll need to provide me with a postal address at some point - we'll sort that out privately once I announce the winners. You've got until 5th August to post.
Last year I took the plunge into Privateer Press's Warmachine/ Hordes games by starting a Minions army. My gators have had a few posts of their own but although I like the models, I found their choices limited, their game play restrictive and a bit defensive in what is generally an extremely aggressive game.
I have been thinking for a while maybe I picked the wrong faction for my play style, certainly when just starting out with a game finding an army you enjoy is important. With the news that my local store 7th Heaven Games was going to run another Journeyman league I thought I'd approach the game with a fresh set of eyes and give it another go.
After a lot of pondering and reading of the excellent BattleCollege I decided that I rather liked the Legion of Everblight.
 |
| Shredders from the Legion of Everblight |
These monsters are the babies of a dragon (Everblight) and, in the world of Hordes, Dragons are serious business - essentially Gods or Titans made real. These little critters are only the tip of the iceberg, the whole army is dripping in shark headed dragon things of all sizes so I was really quite tempted. I have issues with some of the infantry models, but the range choice available compared to Minions was enough that even if I ignored the units I didn't like, I'd still have 3 or 4 times more things to choose from!
 |
| The Cheat from Homestar Runner |
Having chosen my new army, I then had to decide how to paint it. I didn't want to use the standard colours if I could find another scheme that worked plus there's 3 other local players with Legion already so I wanted mine to be a bit different. For inspiration I looked on the official forums for ideas (link here).
I narrowed my inspirations down to 3:
 |
| CloudFang |
 |
| PG_Col_Festus |
 |
| captainspud |
Having chosen three templates, I needed to try them out. I like painting over a black undercoat and while I am happy to take my time, I don't want to go mad with very difficult colours or effects (hello and goodbye yellow). I had some GW Genestealers spare that share a lot of features with the Legion - chitin armour plates, tough skin areas, lots of arms and claws and teeth. Hopefully I would be able to make a decision based on how painting them went. For all the schemes I used GW's current paint range, generally their recommended colour progressions as well. My thinking was I needed to be able to get hold of the colours easily (in order to be able to add to the army for years to come) and if possible avoid mixing highlights to make everything as consistent as I could.


So here's the CloudFang scheme. This was tough to pull off effectively, maybe a Genestealer isn't the best model to try this on, but it was a lot of effort and didn't really look anything like as good as the original inspiration (CloudFang has done an excellent tutorial on his threads if anyone wants to have a go - black undercoat was the biggest mistake here).


PG_Col_Festus tweaking the normal scheme inspired me to do something similar, the Genestealer figure inspired this in part, but its also the same colour combo I used on my Vargheists. I was pleased with how this came out.


So finally CaptainSpud's colours. I was really hoping this would work but orange can be a difficult colour. It took a fair amount of effort, however the final effect was I think worth it and worthy of consideration.
Next I went to social media and asked anyone who would share an opinion what they thought of the three. I was secretly hoping for orange, but the blue-purple was a close second. In the end orange got the thumbs up generally so now convinced I wasn't just orange obsessed and it really did work, it was time to get going...


What's the colours? (For my own reference as much as anything):
Orange : Mephiston Red, Troll Slayer Orange, Fire Dragon Bright - Yriel Yellow optional
Grey : Mechanicus Standard Grey, Dawnstone, Celestra Grey - Nuln Oil wash optional
Blue : Kantor Blue, Macragge Blue, Altdorf Guard Blue
Base stone : The Fang, Russ Grey, Fenris Grey
Base sand : Mournfang Brown, Averland Sunset
Snow : Baking soda and PVA glue!
I'm going to try using Jokaero orange over Mephiston Red in future before Troll Slayer Orange as otherwise it takes several coats to go anywhere over red, so hopefully this will save me some time.


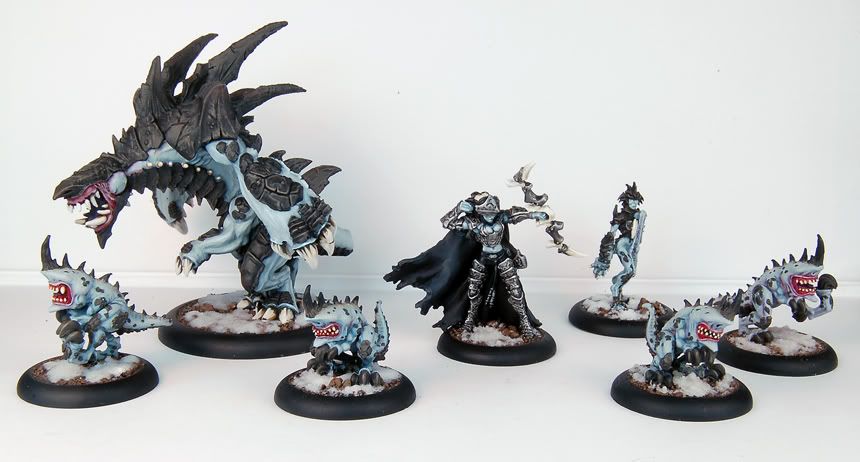
This is Lylyth, my warcaster. I'm still experimenting with the skin tones I want to use on the Nyss (that's northern elves to the uninitiated) but here I've experimented with an orange base blending to a subtle light purple (I don't think you can tell!). The clothes and cloak are orange but with a strong red base. The armour is the chitin grey and as a spot colour I've used dark blue. This wont come up much on the beasts but on infantry there's often too many elements too close together to just use 2 colours to my mind.


So big beasty time. I was already planning ahead by this point and had bought a Legion heavy warbeast box which comes with the components to make 3 different gribbles. Using magnets I would be able to use all of the options in different games, and with 2 torsos to work with, I had a lot of variety very quickly. My wife pointed out that with the main arms and head removed, the torso actually looks like a cute dinosaur, the black ball joints are the eyes and he has a huge chibi style head so I had to take a shot to share this with you.

This is the Carnivean mode. The 11 point monster is a bit of a poster child for the Legion so I was more than happy to have him as my first big warbeast. The three shots I think give you a good impression of how the colour scheme translates and I think looks really effective.


Some shots from the front and rear.


That more or less brings me up to date with my new Hordes army, the henceforth named Legion of Orangeblight. The league expands up to 35 points which means I have a lot more things to paint and I hope to show these in my blog over the coming weeks.
Competition time!
Subscribe to:
Posts (Atom)