He and some of his engineering genius friends have a huge collection (both in number and size) of models for the larger game of 40k and they were keen to have a big landmark battle. The Beer and Pretzels event @ Spirit Games in Burton is hosting this event so I've been working towards this deadline for a while (as have several others!). You can see various bits of progress by my brother and others on MyWargame.com.
I'm taking a bunch of dreads and some other bits but wanted to have a couple of larger toys to contribute. Ben, the genius behind the Imperial Knight above (and seen in many other places including one of Beasts of Wars' podcasts), helped me acquire and build my own Knight and with the recent Tau releases, a Riptide was my second slot easily chosen.
So what have I managed? Find out after the jump.
So first up is my Knight. This guy has been knocking around my painting table for an age. I posted a preview some time ago promising I'd do him one day. I've been using him as a Dread Knight in my Inquisitor army and his armament and size fits that role well.
I had a bit of a play on the rear of the Knight as there wasn't a huge amount of bulk here. I've added some ammo boxes and other bits from my bits box to suggest a bigger generator. I found this chap a bit of a challenge to paint, large areas that are quite sooth and in places quite devoid of detail. Its a functional paint job but I feel I could have done better.
Imperial Knights are organised into houses so have heraldry and ranks and so on much like historical knight households. My Knight is now owned by Inquisitor Coteaz and with my squads split into Red and Blue I had to split this chap down the middle! It also mimics nicely one of the typical heraldic colour splits.
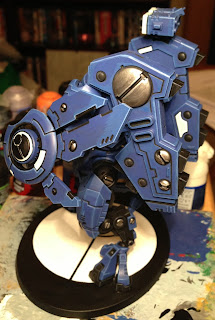
On to my Riptide. Thinking ahead for once, I wanted to do something interesting with the base. Using my circular cutter I made a large version of the Fire Caste symbol (see in the chest and shield of the Riptide) on the base. Its not exactly scenery, it could be some Tau landing pad I suppose, but in my mind it looked quite cool.
So here's a before and after shot. The before is blue-tac'd and propped up so the pose is a little different.
This chap is pretty huge so I spent a lot of time painting him and discovering I'd either rubbed the paint off the edges or managed to smudge wet paint somewhere, and this was doing this in components as well so it could have been worse. I'm not used to painting things this large so I've learnt a few things but overall its a pain.
I magnetised the main guns and the turret weapons so I can switch and change the load out as I get a better idea of what works in the game. It does mean I ran out of bits to attach the other systems with but never mind!
So here's the group shot with all the components and the shield/missile drones. Mission compete, now I just need to work out how to transport it safely...


No comments:
Post a Comment