

I've made these specifically for my Hordes Minion force, but the bigger templates and the technique can definitely be used for other games. I am working on a bigger swamp for Malifaux and we'll see if that's a good size for games like Warhammer and 40k too.
After the jump you'll get to see, in best Blue Peter style, a step by step of one I made earlier.
Excuse some of the photography here, most were taken with my phone as I did the work.

For circular bases I've treated myself to a compass cutter which makes the job of cutting these out a doddle. It does limit the size you can make so for my planned bigger swamps I'll have to come up with a different plan.

Wood filler is used to roughly sculpt out the shape you want your swamp to take. Rather than a simple circular pool a number of broken watery areas looks good, especially on the bigger templates. I've found using a sculpting tool and a lot of water you can move the filler around easily and get a nice goopy finish.

The next couple of steps can done in either order, depending on how you want the details to rest relative to the sand.
Here I've used green stuff to make some interesting features on the swamp. There's no need but I think it adds something to the terrain. Also there's plenty of sculpting materials out there, I just happened to have some greenstuff nearby.

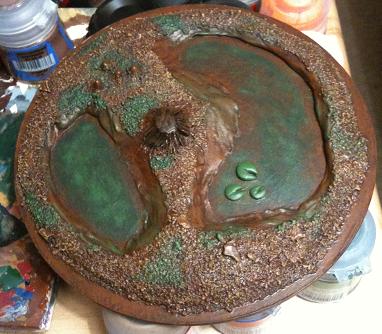
The tree stump was more fun. This was a fairly big blob of green stuff that I slowly teased into a sort of volcano shape using the sculpting tool, making bark like lines down the sides over and over. The top was then smoothed flat (using lots of water).
The stump was sculpted in place so no glue needed, the others I used some PVA to make sure they didn't fall off. Make sure this is dry before moving on to the sanding step.

To sand the swamp, dilute some PVA about 50/50 with water and then coat the areas you want to be sandy in the mix. I like to leave the smooth edges leading to the pools clear and some random other bits too. The pools I avoid completely, which is why if you are gluing interesting features to the swamp you must wait for those to try before moving on to this step else you'll get sand on those (voice of experience here...).
Simply dunk the entire swamp into a box filled with a mixture of sands and stones and you're done. Once dry I paint all the sandy areas with a top coat of PVA mix to make sure that sand doesn't come off.

The base coat I have used is a GW 'base' paint called Dryad Bark. Any dark brown will do, but I find the base paints are especially good at covering in relatively few coats.

Moving on to greens, I've used a variety of different shades to wet and dry brush colour in places that feel right and all over the pond/ water areas. I also shade the sandy areas the GW's Anthonian Camoshade (this stuff is amazing for anything organically brown or green ).

Once everything is dried I have been adding GW's water effect to the pools. I am not sure I like this product so I wont link it! I'm pretty sure that a clear gloss would achieve the same effect as the GW stuff dries to a molecule thick coating despite going on pretty thick. This is disappointing because while it is wet the thick coating looks really good! I am tempted to try some other water effect products to see if the final look of the water can be improved.

This first swamp is the one shown in most of the WIP shots, now with added water effect. Oooo shiny.


Looks great. Certainly beats a printout template of a spawning pool.
ReplyDeleteThanks for stopping by and the comment - I do need to make a spawning pool for my spawn mother and will be using this technique, plus something for eggs. Need to think about what Gupp eggs might look like...
ReplyDelete