Monday, 4 June 2012

Ghouls - lots of them

Its been a busy few weeks so I've neglected my blog a little.  Time to catch up with a bumper post.


Diary notes:

  • A few weeks ago I introduced a number of my friends to Malifaux, the session went quite well with everyone at the least interested in the way the game played (which in contrast to Song of Blades and Heroes is saying something!).
  • I've joined a Warhammer fantasy battle campaign with 7 other players.  Its a larger size (2500 points) than I have been used to so its kicked off lots of mini projects.

Right on to the main post then.  When 8th edition of Warhammer was released it led to a lot of experimenting with what worked on my existing forces.  A clear winner in my Vampire counts army was ghouls, at the time they were the same price as skeletons and far, far superior undead the new core rule set (hello poison and supporting attacks).

My 6th edition skirmishing(!) ghouls
I already had around 28 ghouls, of which only 8 or so were painted.  In previous editions ghouls worked differently every time an army book was released and were never especially effective so I hadn't been too keen on them.


In the 7th edition book at least they were a ranked unit and with the right choices, a vampire could increase the unit size so I had started to build up a good sized unit.  I wasn't a fan of the GW plastic ghouls (more on these shortly) so I looked around and got some of Mantic ghouls (see my previous post on these here including some painting ideas).  I also needed a Ghast to lead the unit so I found this huge beasty from Reaper to lead them.

Don't mess with the big guy
With my gaming group we started a 500 point 'tale of gamers' type series of games to allow people to start new armies and try out Warhammer.  500 points isn't an especially balanced size game, but it was small and fast.  I decided to build an all ghoul army as an add on to my standard force (especially as experiments with skeletons resulted in consistent losses!).

My brother had some very old metal ghouls lying around he wasn't too fond of - I think these are 4th edition as there were earlier incarnations of ghouls (the "night horror" range included at least 2 ghouls) which saw use in 3rd edition and earlier.  I do like to have as many generations of figures as I can in a unit, but these chaps are tiny and pricey on ebay so I'll relax my rule.  After some brush restorer dipping, these were returned to battle ready status in the now trademark purple skin tone.

Comical, but at least they rank up
Finally there's the GW ghouls.  I had bought 20 but only built 10 at this point.  These little @#%$ are not my favourite figures.  They don't rank up and generally look silly with the crazy over the top piercings and trophies.  They do however fill up my ranks and add some variety to the unit so needs must...

Not actually genestealers, honest.
This mob is lead by the Ghoul King from the top of the Terrorgeist.  It seems unlikely to me I'll mount the big bat beastie if I take it, instead using it as a rare choice.  This sorted my second Ghast model out for me.  The real question is, if I do take a Ghoul King on foot, do I use the Reaper giant or the leaping GW model?

So having completed 54 ghouls, including movement trays my ghouls were finished and all good for battle.  I had plans as we expanded beyond 500 points to increase the size of the units so bought some of the really excellent Heresy ghouls to add to the mix.  Then, the new Vampire Count army book arrived.

Great.  Ghouls now cost 2 points more each and can't be raised beyond their starting numbers.  They also cost twice as much as a skeleton.  So for a long time, the Ghouls sat shiny and ready for battle without leaving the shelf.

Now with this big campaign I'm playing in I am considering them seriously again.  If I take a large unit (40+) they may well work for me - an experiment with 30 didn't go too well in my first game, but their size wasn't the only factor in the problems they faced so I am willing to give them a few more tries.  They are also all painted so I want to use them!

I've also finished some more undead themed scenery.  I picked up some gravestones from Mantic (actually produced by Renedra who I think mold Mantic's plastics) and added them to the small pile of bits I had from GW skeleton and zombie sprues.  I still have more left over which I may make more scenery with, but I am also trying out some regimental basing (inspired by my brother and Rob Hawkins).

My unit of skeletons (about to be raised)

Sunday, 13 May 2012

Kirai crew - part 1


Following on from last week, I'm going to walk through my Malifaux crew in a bit more detail.

I was introduced to Malifaux through a few sources.  My brother had an interest some time ago although we didn't get chance to play a game.  Then I saw a few posts about it on Frontline Gamer and was interested again after reading these.

I was finally convinced when a local hobby store ran a Malifaux introductory day.  A watched a few games play though and bought myself a small rulebook.

After getting a feel for what this was all about, I had to decide on how to start the game.  Malifaux is roughly split into 5 factions, each of these having at least some themes running across all the crews within so narrowing down to one of these was one option.  There was the pretty candy approach, pick the miniatures that appealed the most - this nearly did it for me.  Then there was the voice of reason, discussion with veterans of the game and some forum reading.  I was sorely tempted by 'The Dreamer' both the background and the models looked really good to me.  I was warned off as a starter crew they might be a bit much.


Instead, encouraged by my wife's choice and a recent viewing of 'Spirited Away' I chose Kirai and the Spirits of Vengeance.


The Japanese style of these figures plus the undead faction they belonged to gave me several things I could work with.  I didn't know a lot of the Malifaux background when I bought this box, so instead I started thinking of my own.

My crew would be lead by Kirai, who was acting a bit like Dorothy in Return to Oz in my vision of Malifaux.  Taking the role of Chihiro from Spirited Away, Kirai has returned to a spirit world she visited as a child.  This time where there were only occasional dark elements to the world, now the world of Spirited Away is very much a part of Malifaux.  Returning as an adult has seen Kirai again abandon her real name and is known as 'Sin' (rather than 'Sen' from the film) which also ties into Kirai's Malifaux background nicely it turns out.

Kirai and friend
Kirai has become a Master in the world of Malifaux, with the unique ability to bind spirits to her will.  More, she is driven to discover what has become of her protector from her first visit to the spirit world, Haku.  She has been unable to summon him fully to her side, instead only an animalistic, spirit, version of himself has answered her call.  Followed as ever by faithful soot sprites, Kirai dominates the will of other spirits in her quest to find Haku and woe betide any who get in her way!

My Kirai crew then are, where I can find a link, inspired by characters from the Spirited Away film.  In terms of the Kirai figure, I've more or less use the colour scheme from the official boxset, Chihiro wore a red dress in the film so this is fine.  She's standing on wooden boards, as will all the crew.  This represents the bath house that most of the film is set in.  Finally I replaced the decapitated head between her feet with a soot sprite.  While Kirai is certainly not shy when it comes to battle, I felt this was more in character!

Ikiryo, the dark(er) side of Kirai

Spooky head tilt in full operation

Kirai is a 'two part' master in Malifaux.  Able to summon her own dark spirit forth to enact her vengeance from afar, the Ikiryo is a nasty minion that can be unleashed time and again.  This miniature was a tricky one for me to both place in the background and paint.  In the end I decided it was a new character to the story and used a combination of the official colour scheme and one I have used on my warhammer banshees.  I'm reasonably happy with the end result.  There's no real tie to Spirited Away on this character, aside from the mandatory wooden boards.
The robes on these are really nice to paint

The Onryo are a couple of the bath house girls who in the world of Malifaux became drained spirits.  Kirai quickly bound these women to her will.

Again the official colour scheme was used here.  There's plenty of echos from the film in the red and white kimonos, and the jade is a nice third colour to add to the mix.  I do have a couple of soot sprites to add to the bases here, I didn't get chance before the tourney last week.  They are at least mounted on the wooden boards however.


Rar!
Probably the most popular character from Spirited Away is 'No Face'.  This harmless spirit is corrupted by the greed of others in the bath house and becomes a gluttonous monster of titanic proportions in a key moment of the film.

Lots of robes to paint in this crew
This is perfect for the 'Gaki' spirits that can form a wall of slavering monsters in a Kirai crew.  The more of these spirits you have, the hungrier they get - the rules a perfect match for No Face.  I've got a pair of these beasties currently but really I want 3 or more.  I am trying to sculpt one of my own to closely resemble No Face, my first attempt is a bit large for the in game rules however so I am still thinking that one over.

For now I have painted these in dark blues to sharply contrast the colours of the female spirits.  Their skin isn't black as No Face's is, but a dirty grey/brown.  If I do make No Face he will be in his true colours, but these are his lesser cousins.  Once again soot sprites and wooden boards link the crew to their bath house origins.
Finally, for this post, is my Haku figure.  Now in game terms, one of the best characters available to Kirai is the Shikome spirit.  This is actually a sort of Japanese version of a harpy/witch, but I have to admit I really, really dislike the official figure.  This problem was one of the key pieces in the background puzzle I created for myself.  The Shikome's role is that of a relentless hunter.  Fast, flying and very dangerous in melee I quickly thought of oriental dragons, which in terms of Spirited Away is the character Haku when not in human form.

A game winner and clear favourite figure for me
 I hunted the internet for oriental dragon figures and was really surprised and disappointed by what was available - very little.  I finally had some luck with Bushido releasing their Mizuchi figure, which I reviewed here.  I spent a lot of time painting this chap and I am quite pleased with it.   As it represents an older incarnation of Haku, some of his colours are deeper, he's hairier and has longer horns.  His base is decorated with a small paper figure, one of the minions that pursues him during the film.

There's more figures in the crew, but they are not quite complete.  I also have plans to slowly expand Kirai's minions to cover the options that seem to fit the theme, so future posts will cover these.

Sunday, 6 May 2012

Slaughter in Salisbury!

My crew, Kirai's spirits of Vengeance
Well yesterday was quite a success.  I arrived nice and early at the venue in time to help set up the boards ready for a day or wargaming.  In the end there were only 6 participants, however this did make the event feel a lot more friendly and communal as a result.  The tables and scenery were supplied and prepared by Bryan and Pat.  We had a graveyard, a creepy forest and a couple of windy canyon tables to battle over.  Bryan kept everyone in order and was tracking scores throughout the day as well as providing cake!

There were 3 games to be played each throughout the day, each round with a specific strategy to play for.  Each player was also allowed to select up to two schemes per game, however no scheme could be used twice at any point during the day, so selecting the right ones for the right game could be the difference between winning and losing (and it was...).

Round One - Shared Slaughter

Dr Frankenstein, I presume?
My first game was against a a crew from the same faction as me (resurrectionists) - lead by the infamous Dr McMourning.  Controlled in fine humour by Matthew, the game was a slug fest where the objective was simply to do more damage to the other side than they managed on you!

As both of us were keen to increase the size of our crews through our necromantic skills, this had the potential to be a very bloody game.  Things started very well for me, I soon summoned pretty much everything I owned onto the table, well before McMourning had even started thinking about stitching anything abominable together.  As it turned out, time was short for us on the first game and we were only half way through the 3rd turn when it ended.  This caught me rather by surprise and as a result despite being in a commanding position to wipe out around half of McMorning's minions I wouldn't get the chance!

Matthew had been much cannier than I and succeeded in taking out his revealed grudge against my Onryo and managing to kill my Shikome (or the proxy "Haku the dragon spirit" I am using) in the dying seconds of the game through a slow to die action.  I gained only a single point through my own secret grudge scheme.

So round 1 - a loss 1 - 4 victory points.

Round Two - Shared Reconnoitre

Nothing up my sleeves or under my hat, honest
Game two was against Pat, one of the chaps who organised the event, using his show girl crew lead by the slippery Colette du Bois.  Pat knows the game of Malifaux well and was using a complex and subtle crew here.  The mission was to spread out across the table and take control of as many quarters as we could.

I was wary of Colette's sorcerer skills - Pat had a mountain of soulstones in front of him very quickly.  Taking the bull by the horns, I sent Haku the dragon off on a mission of violence against the only none-showgirl Pat had, knowing he couldn't do too many sneaky tricks against this.  After eating the unfortunate gunfighter, Haku continued to distract Pat by munching on his performers, eventually pulling Colette's attention away from the centre of the table.

This was fortunate, magical pigeons were flapping about far too close to Kirai for my liking - I had to dispatch one with her shears!  After a late game summon of Ikiru was incinerated by Colette in a single blast I was getting worried about her simply gunning my spirits down, but again time was running out and I had managed to distract Pat long enough to secure half the board.  Pat managed to secretly claim a nice mausoleum, but I had successfully bodyguard'ed Kirai after announcing it to him, so managed a narrow win.  As Pat is fond of saying, even if you get wiped out, in Malifaux you can still win if you did what you were supposed to.

So round two - a win - 4 -3 victory points

Round Three - Shared Claim Jump

Some interesting models in this crew, not sure
 they are a great choice out of the box however
Feeling a bit more positive after the second game, I faced Rob using an interesting choice of crew - Lucius's special forces.  This is a bit of a brave choice as Lucius is a henchman not a full master so considered a bit weaker than standard.

Knowing a bit about this crew (their rules are much less complex than Colette's!) I played very aggressively.  This suited the mission well as I needed to own the centre of the table to win.  Ryle was real concern to me, so I made him the target of a scheme and proceeded to hit him really hard before he could fire that blasted cannon at me too many times.  After that, Lucius's men were outnumbered and outclassed by my swarming spirits.  Haku had another blinding game - eating the guard captain and Lucius!  At the end of time for the round only a single guardsman was standing (just, on 1 wound) and I had dominated the table, gaining all the victory points I could.  Rob had some terrible luck, his cards never seemed to be much help to him.

So round three - a win, 6 - 1 victory points

So after the dust had settled and the points were added up, the placings were read out.

In third place was Matthew.  I'm not quite sure how his fortunes faired after his victory over me, I know I heard that McMourning had died in at least one of his games.  Regardless a fine performance.

Somewhat unexpectedly (at the time) I came second.  Turns out Bryan, the main organiser, had taken himself out of the running as he was only playing to help with numbers (he should have won by my reckoning).

In first place was (Viking) Dan.  I didn't play Dan so  don't know how mean his crew were, but I did see some rather empty tables opposite him through out the day, except when he played Bryan...  All the same, very well done!

There were non-place prizes too, one for sportsmanship - won most deservedly by Matthew who remained upbeat, fun and in character throughout the day, and one for painting.  Now to be fair only 4 of the players had any serious amount of paint on their crews but I had spent a fair few hours the last few weeks working on mine so I was hoping to be in with a good chance of clinching this prize.

The votes went my way (I don't know if Bryan again took himself out of the running) 
and I got this fine certificate to remind me.  Very pleased I am too.

There was a 'bad luck' prize for Rob too, he received a new card deck to hopefully improve his luck in future!

So all in all a fun day and a pleasing result.  Thanks and well done to Bryan and Pat for putting this all together and thanks to 7th Heaven for sponsoring the event.

I'll post more about my crew, the theme I am using and how Malifaux the game works in future posts.  For now here's a couple of shots of my crew's leader Kirai and my star of the tourney, Haku.

These shears aren't just for show as a magic pigeon found out
Fast, poisonous, relentless and cool, its Haku

Friday, 4 May 2012

Getting ready

Just a quick post to get up to date and clear the decks for the next series of posts.

The main, full sized rulebook.
Now rarer than hen's teeth.
I've been getting prepared to take part in a Malifaux tournament.  I've never actually taken part in a competitive event before so this is something new.  It's been billed as a starter event so hopefully I wont feel like a total idiot.  As a result I've been painting a lot and playing a number of games to 'get my win on' as the event organiser would put it.  I've also been trying to read up on as much as I can - knowing that some characters can instant kill you in revenge for killing them is good to know...

I managed to watch and then take part in a game last week, my opponent was using a crew lead by, essentially, a giant evil wooden puppet.  It was a fairly unique gaming experience, one of the reasons I am currently enjoying the game so much!

I always thought Punch and Judy were sinister...
Sadly we ran out of time to complete the game, so it ended on a draw.  I was hopeful I could turn the game into a win given a full game, so a very useful learning experience.

Mine's like this, but green and
not ready for blogging
I also squeezed in a game of 40k this week.  It was a chance to try out my Contemptor dreadnought.  I had agreed with my opponent (good old Greg) that we could both use things from the Imperial Armour book that had the 40k stamp on it.

Greg tried out a couple of Warp Hunters.  Turns out they aren't very 40k ready - some might even say they are 'broken'.  So this combined with an unbelievable turn of saving throws from Greg's assorted turbo boosting jetbikes and apparently invulnerable farseer meant I lost 7-5 on kill points to a very well commanded Eldar army.  The game was fun all the same but I think we'll save the Forge World rules for really big games in future.

So its back to the painting table to see if I can get all my figures in a reasonable state for tomorrow.  Report and finally some pictures of my crew soon to follow.

Sunday, 22 April 2012

Making your own 40k scenery - part 2

Couple of quick updates before the main part of the post:

  • I've written a guest post on Mywargame reviewing the really nice Mizuchi miniature I got recently.  I'll blog the finished job soon as he's all but finished now (assuming the varnish I just applied doesn't ruin it).
  • Played a game of Warhammer Fantasy, Tomb Kings vs. my Vampires.  Ended up a fairly convincing win even though my general fell to the curse of the Tomb Prince.  Luck was very much with me at several key points and I still made several "I should know better" mistakes, so all in all a fun game (thanks Rob) with some good take homes.

So back to the scenery...

I've been casting up extra blocks on and off for months and having ideas about making a big fortification of some kind.  I've looked through the planet strike rules and fancied having a go at some point so this was partly driving me, but I'd also been given a nice big Imperial double door by my brother that I wanted to stick on to something.

A few weeks ago I decided I would see if I could build something in a week, just in time for a scenario game I was hosting for some friends.  You can have a look at the scenario here if you wish.

The idea was that this bigger fortification should be usable on its own, but also look in keeping with the bunkers I'd already made, so a line of fortifications could be put together that looked quite nice.  With this in mind I used the design of the bunkers as the template to construct a much larger building, with 2 floors.

There's a few challenges with a building of this size made of plaster of paris that's going to be used for gaming rather than just display.

  1. It needs to be strong enough to support its own weight plus that of miniatures.
  2. It needs to have access points for miniatures to enter/exit the structure and also ideally to see out from for line of sight while shooting.
  3. It needs to be of a size that I can store it safely somewhere.
So here's what I did:

This is the ground floor.  It's pretty large, each of those tiles holds a 40k miniature easily.
Using the bunker walls as a design starting point (especially the window slots) I started dry assembling a front wall that included the big double doors.  The doors were a bit higher than I wanted the entire structure to be so they influenced the shape of the front quite a lot as you'll see on later pictures.  Once I had an idea of the size of the front I quickly dry built walls for the side and rear to make sure I had enough bricks - it was looking good so I started designing the side and rear walls in more detail.  I wanted a rear entrance that was recessed hence the 'C' shape design.  It also saved me tiles as it was looking very tight for that particular brick type.
The 1st floor, the centre section is mostly enclosed, the sides sheltered and the front exposed.
Having worked out the rough footprint of the ground floor, I started planning the 1st floor.  This I wanted to have a command bunker section, but be overall smaller than the ground floor so I wasn't building a tower block.  I also took a very simple shortcut in terms of access between floors - I didn't worry about it.  I did leave a hole in one of the sections to suggest that there's different hatches to allow for this.
The roof!  I ran out of tiles at this point so it was brownie blocks to the rescue!
The roof was more complex than I first thought.  Having now designed the ground and 1st floors in detail, I was running seriously low on bricks.  I did have a pile of brownie bricks spare, but they aren't quite the same dimensions as the Hirst moulds.  I found a combination that almost worked and then did some trimming with a knife and filling with wooden stirrers.
Front view with all levels assembled
So having worked out the overall design I started sticking the various sections together with PVA.  I generally started by making lots of subsections that were very similar to the walls of the original bunkers.  The plan was that rather than trying to build it all in one go and discover there was a fault in one brick that compromised the entire thing, at most this would affect a small section and hopefully could be compensated for when I assembled the sections.

Rear view and a sneaky sandbag lizard
Due to the size of the structure I needed a sturdy base and also decided to base the 1st floor as well.  The Hirst power station I've already built does have a large roof without a base, but this was going to be larger and heavier than that so I didn't want to risk it.  Both the ground and first floors were constructed before gluing them to their bases, again to avoid any defects in the bricks affecting the overall shape.  The ground base is mounting card, the 1st floor some plasti-card.
Side view, gives an idea of how the front is offset   
Like the bunkers and power station before it, all the touch points between floors have had a generous coating of PVA after painting to try and reduce wear and tear due to in game moving of the sections.  This is especially likely near the front door arch as its a fair tight fit.
The finished product - not 100% on the base but there's so many other things to  paint
After coating it in gesso primer, I painted it in a series of GW paints, starting with a foundation (now base) paint that goes a long way even when diluted.  I had a suitably large Aquilla left from the 40k basing kit to mimic the motif from the bunker so I added that to the 1st floor bunker.
The bastion laid out with my walls and bunkers.  Looks ok to me, need more walls!
Finally here's the "bastion" lined up with my other fortifications.  I think as a defence line it looks quite good and certainly fills a big part of a gaming table.

Sunday, 15 April 2012

Making your own 40k scenery - part 1

After a very long break (over 10 years) I decided to start collecting and playing 40k again a couple of years ago.  I'll cover my army(-ies) in future posts, these next few posts are about the scenery I've been making.

The second coming of my Dark Angels!
I covered my simple table set up and simple roads on mywargame yonks ago, so there's the links.

After a table and roads, buildings were next on the list.  I looked into an 'easy' way to make lots of my own 40k scenery.  There's lots of companies out there that sell excellent stuff so to be 'easy' it needed to be quick and cheaper than buying these kits.  I've had mixed success, time being the big issue so pre-made kits are becoming more appealing so I can spend my time painting and playing, but still, I started documenting my efforts but never posted a blog covering them.  I have also bought a number of kits that I might post about at some point as well - some are very deserving of praise.

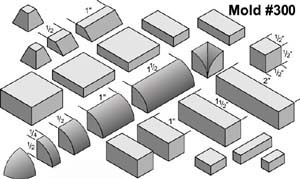
The route I went down initially then was moulding my own pieces to construct various buildings.  After some web surfing I found the really excellent Hirst Arts site.  After reading up on the materials needed and techniques involved I thought 'I can do that' and then had to decide what mould(s) to buy.  Realistically the moulds are quite expensive so I was going to have to either make a LOT of scenery to justify the cost or find one mould that would do a lot of work.

I decided that mould 300 - 'Station builder' would do a lot for me - the example structures alone would be a good start.
Not the most exciting picture, sorry
So I ordered my mould and then went about collecting the other materials I would need.  Again the Hirst site has a lot of information about how best to set yourself up so I wont go into a lot of detail.  Key thing I found that was apart from the plaster of paris, all of the tools I needed I managed to pick up from Poundland so it cost me very little.  I've cast from the mould over 40 times (I didn't count, I can work it out from the Hirst instructions!) and all of my kit is still fine so no problem there.

One thing I did discover was that I tended to mix a bit too much plaster each time to ensure I had enough to fill the entire mould.  My wife on an inspired shopping trip solved this issue - 
Lakeland's finest
Yes, brownie moulds.  I simply pour the spare plaster into this mould and now have a collection of large blocks for use in future projects.  They aren't quite the same dimensions as the Hirst blocks, but they are close and I have managed to find several uses for them.

So armed with a pile of blocks and instructions on how to use them I went ahead and built a bunch of things.  I've been using PVA to glue it together (the Hirst site recommends all sorts of things, largely of an American flavour) and base coating the structures with Gesso Primer to both seal the surface and give it some 'tooth' so the subsequent paints don't come off so easily.  I recommend basing the structures - I've been using mounting card (I have a large supply hanging around).
Bunker in progress, with a Dark Angel marine for scale
Mostly finished bunker (base needs finishing)
The bunker was my first building and I liked it so much I made two in the end.  I've added the Imperial Aquila from the 40k basing kit to the front and a few spare bits to the base for flavour.
STATION
I also made a power station, a significantly bigger model than the bunker which has seen a lot of use in many battles as its a good size for breaking up a battlefield.  Like the bunkers the roof is removable so if you wish you can put figures inside.  I've coated the surfaces that meet with PVA to help with wear and tear. Also like the bunkers, this isn't quite finished...
Wot no caption?
I've also made a few walls, making use of the 'brownie' blocks - with added battle damage.  Very easy to do with plaster of paris - a knife, drill, scissors or even determined finger nail will add some effective looking battle damage to the material.

Well that's the end of part I - part II will cover the latest building I've built, this time of my own design and the scenario that inspired it.

Wednesday, 11 April 2012

Grave News!

Its been a few weeks since I posted, been very busy.

  • Played some more Malifaux, against Lady Justice Guild and managed a reasonable draw - might have even squeaked a narrow win if the game had carried on for a turn or two more.
  • Played some WAB - another terrible game for the Macedonians.  The new (to me anyway) rules make my phalanxes even less mobile than before.  Time to try the cavalry again in my next game.
  • Wrote up a 40k scenario and had to frantically build some scenery for it.  I've had this in the back of my mind for some time.  I 'GMed' the game, with Orks facing Eldar.  I'll do a post on this and the scenery shortly.
  • Been playing a lot of Risk Legacy over the Easter weekend.  Its a very interesting idea, the basic Risk board and armies take on different characters over a series of quite quick (by Risk standards) games. I can't go into much detail without spoiling the fun - a lot of the game's enjoyment comes from elements that are only revealed after certain things happen.  We laughed a lot over these games and there's still more to unlock in the future.

Enough excuses - I was hoping to have something to post about a week ago, but finally a project on my hobby table has been finished.  I've been working on the Garden of Morr set on and off for a month or two and am pleased to have got it table top ready and have had a small skirmish through the creepy architecture (Malifaux).  Its a great set that I can use for Warhammer, Mordheim and Malifaux easily, I'm sure other games too.

I've done a quick guide to the stone effect I used - credit to Brian for the recipe (possibly obsolete now thanks to the new GW paints!)

First, over a black undercoat use Adeptus Battlegrey foundation
Second, wash the all the recesses (however slight) with Badab Black 
Third drybrush generously with Codex Grey
Lastly drybrush more carefully with Astronomicon Grey

Here's a shot of all the pieces
Close up on the Gate and stone walls
Various mausoleums and a statue