Showing posts with label Tutorial. Show all posts

Thursday, 1 August 2013

Making snow bases for miniatures

A mid week post!

As a follow up to my Legion of Orangeblight post, I've put together a quick step by step tutorial of how I made the bases.  I like to imagine someone asked me how I did it.

I also want to remind anyone out there who might be interested that I am giving away some painted Genestealers as a little compo on my previous blog post - not many people seem keen so a very good chance you'll get one if you follow the instructions.

So, snowy bases.

Step 1: Select your bases.   These are 40mm round recessed bases for Hordes figures, but this works for most bases.
Step 2: The left base is going to be a low base and I need to cover the slot as I will be using sand to texture the base.  The right will be raised with stone, using cork, so I dont need to worry about the gap.
Step 3: PVA.  I water the glue down by varying amounts for different uses.  At this point its 80% glue, a nice thick coating.
Step 4: Positioning some cork.  This is a 2-3mm thick piece from a tile.  Different thicknesses work, depending on the look you are after and what you can find (I'm struggling to find a supply).  The cork will stick really firmly to the PVA.
Step 5: Dipping in sand.  I have a tin with sand of all sorts of grades mixed in and some small bits of slate.  Whenever I pop to a hobby store and they have some sand I haven't seen before I buy a small bag and add it to my tin.  Make sure all the PVA is covered at this stage.
Step 6: Sealing the sand.  (Important!) Once the first coat is completely dry, using more PVA (50% mix this time) I completely coat all the sand with glue.  I've found over the years the bottom coat alone will slowly shed sand over time, especially if you play with the figure or transport it a lot,  This step helps prevent that somewhat.
Step 7: While the top coat of PVA was drying I added some more cork to my stony base to raise the level and make it wider - the beastie I have is quite long for his base size.  PVA used again (100%).
Step 8: (Only once everything is dry) position the figures. I'd already put together the figures that these bases were destined for (yes filed, pinned and greenstuff'd like the OCD hobbist I am) and added pins to their feet.  Using these as guides I was able to make small holes in the bases.  Next I used a pin vice to drill deep holes into the bases so I knew where they would sit once painted  - its easier to do this before you do a nice job and then mess it up with a drill!
 Step 9 : Undercoat - your usual choice of black spray
Step 10: Sand base coat.  I'm using GW mournfang brown here.
Step 11: Dry brush sand.  Using a small dry brush I've coated this sand in GW Averland Sunset.
Step 12 & 13: I missed a couple of photos here!  First I base coated the stone in GW Fang and then drybrushed it with both Russ Grey and Fenris Grey.  I should have tidied the black edges of the bases at this point - make sure you do.
Step 14: Snow goo.  So my recipe for cheap snow is baking soda and PVA.  I mix by eye, till I get the consistency you see here.  Just add more powder or glue as needed till you are happy.
Step 15: Apply snow like paste.  Plonk the snow down where you think looks best.  I'm still figuring out how best to do this both practically (with a paint brush or modelling tool seems best so far) and aesthetically (it doesn't always look great).  You can apply many layers of paste if you like (leave each to dry before adding the next) if you want really deep snow.
Step 16: Make fluffy snow.  Once everything was dry, using PVA (80%) I lightly coated the snow paste and then dusted the bases with baking soda.  This will mean that powder will come off the bases for a while (even blowing really hard doesn't remove all the loose powder) but it looks much better than leaving at just the paste stage.

Step 17: Was tidy up the paint on the bases but I quickly found out that the baking soda sucks paint to it from some distance away so this is not the place to do this.  Tidy the bases at step 13.

Well that's it, hope this is useful and don't forget, free Genestealers!

Sunday, 7 October 2012

Making your own wargames scenery - swamps

So as promised previously, here's a post on making some swamps.

I've made these specifically for my Hordes Minion force, but the bigger templates and the technique can definitely be used for other games.  I am working on a bigger swamp for Malifaux and we'll see if that's a good size for games like Warhammer and 40k too.

After the jump you'll get to see, in best Blue Peter style, a step by step of one I made earlier.


Saturday, 1 September 2012

Making your own fantasy scenery - Wizard's tower


Despite having a Blue Peter project box that's slowly taking over my entire gaming room, I rarely make scenery from scratch.  There's a lot of companies out there producing excellent stuff at good prices and I also have my Hirst mold that I've covered previously.  However over Easter 2011 my mad scientist friend Steve was visiting and after polishing off a tube of Pringles we came up with a 'make a wizards tower in a weekend' challenge.

The finished article
Well the photo above shows what we managed to make during that weekend.  Pretty pleased with it we were too as it was very much spur of the moment, no planning and frankly Steve is 97% enthusiasm and 3% skill I'm sure he wont mind admitting.  

So after selecting a couple of Pringles tubes as the basis we had to work out what we would do with the general look of the thing.  I have a lot of cardboard lying around so that allowed Steve to get cracking on the shingles for what inevitably had to be a conical roof.  This took a long time to make but looks great now its done.  Each roof is capped with a bit of baking foil.  I liked the idea of some bracing sections to break up the large wall surfaces so some thin card strips were added.

I also have some sheets of plasti-card for occasional conversion and basing jobs on miniatures so this allowed us to come up with the bridge, doors and windows for the double tower construction.  The window and door frames are deliberately wonky and a-symmetric - Steve was in an arty mood!

I had some spare bits from my Hirst molds that were put into use as jutting joists under the roofs and as abutments (I think that's what they are) on the bridge.  We also used a couple of wooden coffee stirrers as braces on the bridge as these are a bit thicker than card and there was no need to bend them.

The towers are mounted on a double layer of packing polystyrene I'd been saving.  Using a hot wire cutter Steve created the rough shapes you see and I then hot glue gunned the two sections together and to a mounting card base.  

My dog photo bombed the original shot, so here he is in full, glorious fluff-o-vision
The hill base also had some slots cut into it to allow some steps to be forced in, leading up to the front door - you'll see them more clearly further down.  Once the main sections were arranged, the entire thing was glued together with a combination of hot glue, PVA and when all else failed cello-tape!  Some loose sand and gravel was added in places to add further variety to the hill.

The hill section was coated in artex to give it texture and hide the polystyrene - this also meant it wouldn't melt when I under-coated it!  Just to be extra sure I also painted this section with my latex primer to give it even more of a sealed coating and further texture.  finally the joins between the tower and the base were hidden using wood filler.  This stuff is great and I have more things I want to show where I've used this in future.

Its black, BLACK!
A quick spray undercoat of black and we are ready to paint.  It could have been white, but black allowed me to be a little slapdash and not worry about every spot.  This is gaming scenery so its going to take knocks  so it only needed to look effective not win any awards.

A front view
So here it is 'completed'.  Well the painting is anyway.  This is going to live in my local gaming store so I am going to let Rob flock it to suit his boards, so some of the brown areas will have a nice green fuzz effect on them shortly.  I'll snap a shot of this once he's sorted that out.

Rear view
As you can see I've picked a slightly strange colour scheme, something Steve and I discussed and agreed on was that this tower belongs to a fairly eccentric mage so purple and light bluey-white it is.


Main door
Here's the front door.  All made out of plasti-card apart from the door knocker which is a spare bit from another kit I'll show at some point in the future.  Wood effect was simply scored into the plastic with a sharp craft knife.

Stairs
Here's the stairs, I can't actually remember what they are made of, but being quite thick its probably balsa or foam card.  Artex provided some texture but they are a bit slap dash!
Walkway between towers
Last shot, so you can see the bridge section has somewhere to place miniatures and Steve even went to the effort to make a pair of wonky doors too.  The gantry has wood effect scored into it too.

Sunday, 22 April 2012

Making your own 40k scenery - part 2

Couple of quick updates before the main part of the post:

  • I've written a guest post on Mywargame reviewing the really nice Mizuchi miniature I got recently.  I'll blog the finished job soon as he's all but finished now (assuming the varnish I just applied doesn't ruin it).
  • Played a game of Warhammer Fantasy, Tomb Kings vs. my Vampires.  Ended up a fairly convincing win even though my general fell to the curse of the Tomb Prince.  Luck was very much with me at several key points and I still made several "I should know better" mistakes, so all in all a fun game (thanks Rob) with some good take homes.

So back to the scenery...

I've been casting up extra blocks on and off for months and having ideas about making a big fortification of some kind.  I've looked through the planet strike rules and fancied having a go at some point so this was partly driving me, but I'd also been given a nice big Imperial double door by my brother that I wanted to stick on to something.

A few weeks ago I decided I would see if I could build something in a week, just in time for a scenario game I was hosting for some friends.  You can have a look at the scenario here if you wish.

The idea was that this bigger fortification should be usable on its own, but also look in keeping with the bunkers I'd already made, so a line of fortifications could be put together that looked quite nice.  With this in mind I used the design of the bunkers as the template to construct a much larger building, with 2 floors.

There's a few challenges with a building of this size made of plaster of paris that's going to be used for gaming rather than just display.

  1. It needs to be strong enough to support its own weight plus that of miniatures.
  2. It needs to have access points for miniatures to enter/exit the structure and also ideally to see out from for line of sight while shooting.
  3. It needs to be of a size that I can store it safely somewhere.
So here's what I did:

This is the ground floor.  It's pretty large, each of those tiles holds a 40k miniature easily.
Using the bunker walls as a design starting point (especially the window slots) I started dry assembling a front wall that included the big double doors.  The doors were a bit higher than I wanted the entire structure to be so they influenced the shape of the front quite a lot as you'll see on later pictures.  Once I had an idea of the size of the front I quickly dry built walls for the side and rear to make sure I had enough bricks - it was looking good so I started designing the side and rear walls in more detail.  I wanted a rear entrance that was recessed hence the 'C' shape design.  It also saved me tiles as it was looking very tight for that particular brick type.
The 1st floor, the centre section is mostly enclosed, the sides sheltered and the front exposed.
Having worked out the rough footprint of the ground floor, I started planning the 1st floor.  This I wanted to have a command bunker section, but be overall smaller than the ground floor so I wasn't building a tower block.  I also took a very simple shortcut in terms of access between floors - I didn't worry about it.  I did leave a hole in one of the sections to suggest that there's different hatches to allow for this.
The roof!  I ran out of tiles at this point so it was brownie blocks to the rescue!
The roof was more complex than I first thought.  Having now designed the ground and 1st floors in detail, I was running seriously low on bricks.  I did have a pile of brownie bricks spare, but they aren't quite the same dimensions as the Hirst moulds.  I found a combination that almost worked and then did some trimming with a knife and filling with wooden stirrers.
Front view with all levels assembled
So having worked out the overall design I started sticking the various sections together with PVA.  I generally started by making lots of subsections that were very similar to the walls of the original bunkers.  The plan was that rather than trying to build it all in one go and discover there was a fault in one brick that compromised the entire thing, at most this would affect a small section and hopefully could be compensated for when I assembled the sections.

Rear view and a sneaky sandbag lizard
Due to the size of the structure I needed a sturdy base and also decided to base the 1st floor as well.  The Hirst power station I've already built does have a large roof without a base, but this was going to be larger and heavier than that so I didn't want to risk it.  Both the ground and first floors were constructed before gluing them to their bases, again to avoid any defects in the bricks affecting the overall shape.  The ground base is mounting card, the 1st floor some plasti-card.
Side view, gives an idea of how the front is offset   
Like the bunkers and power station before it, all the touch points between floors have had a generous coating of PVA after painting to try and reduce wear and tear due to in game moving of the sections.  This is especially likely near the front door arch as its a fair tight fit.
The finished product - not 100% on the base but there's so many other things to  paint
After coating it in gesso primer, I painted it in a series of GW paints, starting with a foundation (now base) paint that goes a long way even when diluted.  I had a suitably large Aquilla left from the 40k basing kit to mimic the motif from the bunker so I added that to the 1st floor bunker.
The bastion laid out with my walls and bunkers.  Looks ok to me, need more walls!
Finally here's the "bastion" lined up with my other fortifications.  I think as a defence line it looks quite good and certainly fills a big part of a gaming table.

Sunday, 15 April 2012

Making your own 40k scenery - part 1

After a very long break (over 10 years) I decided to start collecting and playing 40k again a couple of years ago.  I'll cover my army(-ies) in future posts, these next few posts are about the scenery I've been making.

The second coming of my Dark Angels!
I covered my simple table set up and simple roads on mywargame yonks ago, so there's the links.

After a table and roads, buildings were next on the list.  I looked into an 'easy' way to make lots of my own 40k scenery.  There's lots of companies out there that sell excellent stuff so to be 'easy' it needed to be quick and cheaper than buying these kits.  I've had mixed success, time being the big issue so pre-made kits are becoming more appealing so I can spend my time painting and playing, but still, I started documenting my efforts but never posted a blog covering them.  I have also bought a number of kits that I might post about at some point as well - some are very deserving of praise.

The route I went down initially then was moulding my own pieces to construct various buildings.  After some web surfing I found the really excellent Hirst Arts site.  After reading up on the materials needed and techniques involved I thought 'I can do that' and then had to decide what mould(s) to buy.  Realistically the moulds are quite expensive so I was going to have to either make a LOT of scenery to justify the cost or find one mould that would do a lot of work.

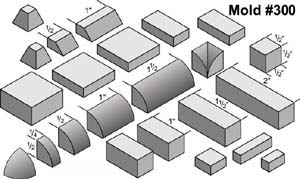
I decided that mould 300 - 'Station builder' would do a lot for me - the example structures alone would be a good start.
Not the most exciting picture, sorry
So I ordered my mould and then went about collecting the other materials I would need.  Again the Hirst site has a lot of information about how best to set yourself up so I wont go into a lot of detail.  Key thing I found that was apart from the plaster of paris, all of the tools I needed I managed to pick up from Poundland so it cost me very little.  I've cast from the mould over 40 times (I didn't count, I can work it out from the Hirst instructions!) and all of my kit is still fine so no problem there.

One thing I did discover was that I tended to mix a bit too much plaster each time to ensure I had enough to fill the entire mould.  My wife on an inspired shopping trip solved this issue - 
Lakeland's finest
Yes, brownie moulds.  I simply pour the spare plaster into this mould and now have a collection of large blocks for use in future projects.  They aren't quite the same dimensions as the Hirst blocks, but they are close and I have managed to find several uses for them.

So armed with a pile of blocks and instructions on how to use them I went ahead and built a bunch of things.  I've been using PVA to glue it together (the Hirst site recommends all sorts of things, largely of an American flavour) and base coating the structures with Gesso Primer to both seal the surface and give it some 'tooth' so the subsequent paints don't come off so easily.  I recommend basing the structures - I've been using mounting card (I have a large supply hanging around).
Bunker in progress, with a Dark Angel marine for scale
Mostly finished bunker (base needs finishing)
The bunker was my first building and I liked it so much I made two in the end.  I've added the Imperial Aquila from the 40k basing kit to the front and a few spare bits to the base for flavour.
STATION
I also made a power station, a significantly bigger model than the bunker which has seen a lot of use in many battles as its a good size for breaking up a battlefield.  Like the bunkers the roof is removable so if you wish you can put figures inside.  I've coated the surfaces that meet with PVA to help with wear and tear. Also like the bunkers, this isn't quite finished...
Wot no caption?
I've also made a few walls, making use of the 'brownie' blocks - with added battle damage.  Very easy to do with plaster of paris - a knife, drill, scissors or even determined finger nail will add some effective looking battle damage to the material.

Well that's the end of part I - part II will cover the latest building I've built, this time of my own design and the scenario that inspired it.